Water and Air | Three Experiments You Can Try at Home
- Oct 12, 2022
- 3 min read
When learning, visual experiments are great to gain a better understanding of a topic. In science class, you have likely participated in tons of class experiments to understand a topic you recently learned. But have you ever done this to learn for yourself? I have always been interested in how water functions and reacts with other aspects of the world. Therefore, I completed the following experiments to learn more about water and air through these (mostly) simple activities. I recommend you try any of these out to expand your understanding of water and have fun while doing it.
Capillary Action
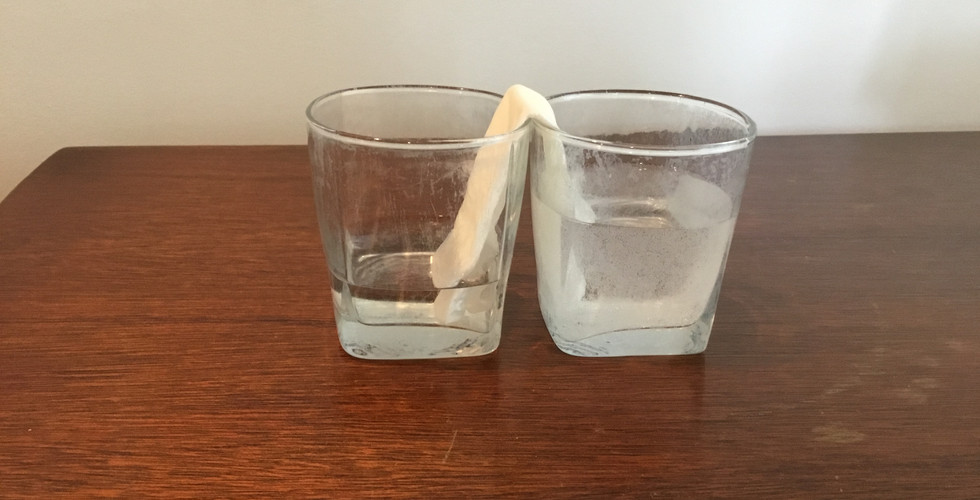
Capillary action is the movement of a liquid, such as water, across a solid due to the
attraction of molecules between the liquid and the solid. This process occurs without the assistance of external forces, such as gravity. Through this experiment, you can view the process of capillary action as water moves from one glass to another.
Supplies
Drinking Glasses (x2)
Water
Paper Towel/Tissue Paper
Food Dye (Optional)

Steps
1. Fill one glass with water and fold your towel/tissue into a rectangular shape. Add food coloring to the water if you want.

2. Place the paper towel between the glass with water and the cup.

3. Wait and watch as the water transfers from one glass and culminates in the other. This process will continue into the water is about equal in both glasses.


Need more help? Check out this video for more guidance!
The Water Cycle
The water cycle is the process by which water travels from the sea through the air. This
occurs as water enters the atmosphere through evaporation and returns to the surface through precipitation. This cycle continues and includes many more steps as water moves through the ground and the atmosphere. Through this experiment, you can view the effects of evaporation, condensation, and precipitation.
Supplies
Large Bowl
Small Bowl
Water
Plastic Wrap
Ice
Pot
Kitchen Gloves

Steps
1. Pour the water into a pot and wait for it to boil. *Pot and water will be warm, use kitchen gloves for added safety*

2. Pour the water into the large bowl. Afterward, place the small bowl in the water.

3. Cover the bowl with plastic wrap, making sure it is tight and all gaps are covered. Then, place the ice on top of the wrap.

4. Wait 15-20 minutes. You will begin to see water condensate on the plastic wrap.

5. Wait another 5 minutes and take off the plastic wrap. Be careful to prevent any of the melted ice from slipping into your bowl or on your table.

5. Check your bowl to see how much precipitation has been collected inside of your smaller bowl. The longer you wait, the more water will be collected!

Need more help? Check out this video for more guidance!
Cloud Chamber
A cloud chamber is a device containing air and water vapor. A cloud forms as the warm
water vapor interacts with the cloud in the container. In this cloud, paths of electrically charged particles, such as alpha particles, can be seen as they pass through the chamber. Through this experiment, you should be able to visibly see radiation in your chamber. **This experiment requires dry ice. Some stores will require a customer to be 18 years or old to purchase the dry ice**
Supplies
Clear Container (such as a jar)
Tight Lid (such as the jar's lid)
Absorbent Material (such as a sponge)
Scissors
Glue
Dropper
Insulated Container
Small Bowl
Water
Flashlight
Kitchen Gloves
Isopropyl Alcohol
Dry Ice

Steps
1. Cut your absorbent material to fit the bottom side of your clear container. This may take a few tries if you are using a circular container as I did.

2. Glue your absorbent material to the bottom of your jar.

3. Boil the water (see "The Water Cycle," Step 1" and obtain the dry ice. *You will only have a few hours to use it as it evaporates at room temperature*

4. Use the dropper to add the isopropyl alcohol to the absorbent material, ensuring it is fully covered.

5. Add the dry ice to the base of the insulated container. *Use kitchen gloves to move the dry ice due to its extreme temperature. You may want to request the help of an adult*

6. Turn off the lights and apply the lid to the clear container and place it on the dry ice. Then, place the bowl of warm water on the container.

7. Wait 5-10 minutes. Shine your flashlight directly into the cloud which should have formed inside your container.

My sponge sadly fell while the cloud was forming, so I was not able to get a picture of the radiation. You should be able to see long strands formed by particles shooting through your cloud chamber.
Need more help or want to see how the radiation should appear? Check out this video for more guidance!
I hope you learned or were reminded of the science of the world through these experiments. In the future, I recommend you look up similar experiments to learn complex topics to gain a better understanding. I wish you good luck in your exploration!


