Creative Mother's Day Gifts Every Mother Will Love!
- May 5
- 4 min read

There are few things more meaningful than receiving a gift that you can tell someone put a lot of thought and creativity into. Pass the torch this Mother's Day and give back to the one who gives you the greatest gifts of love and care every day with these fun crafts.
Sticky Note Flowers
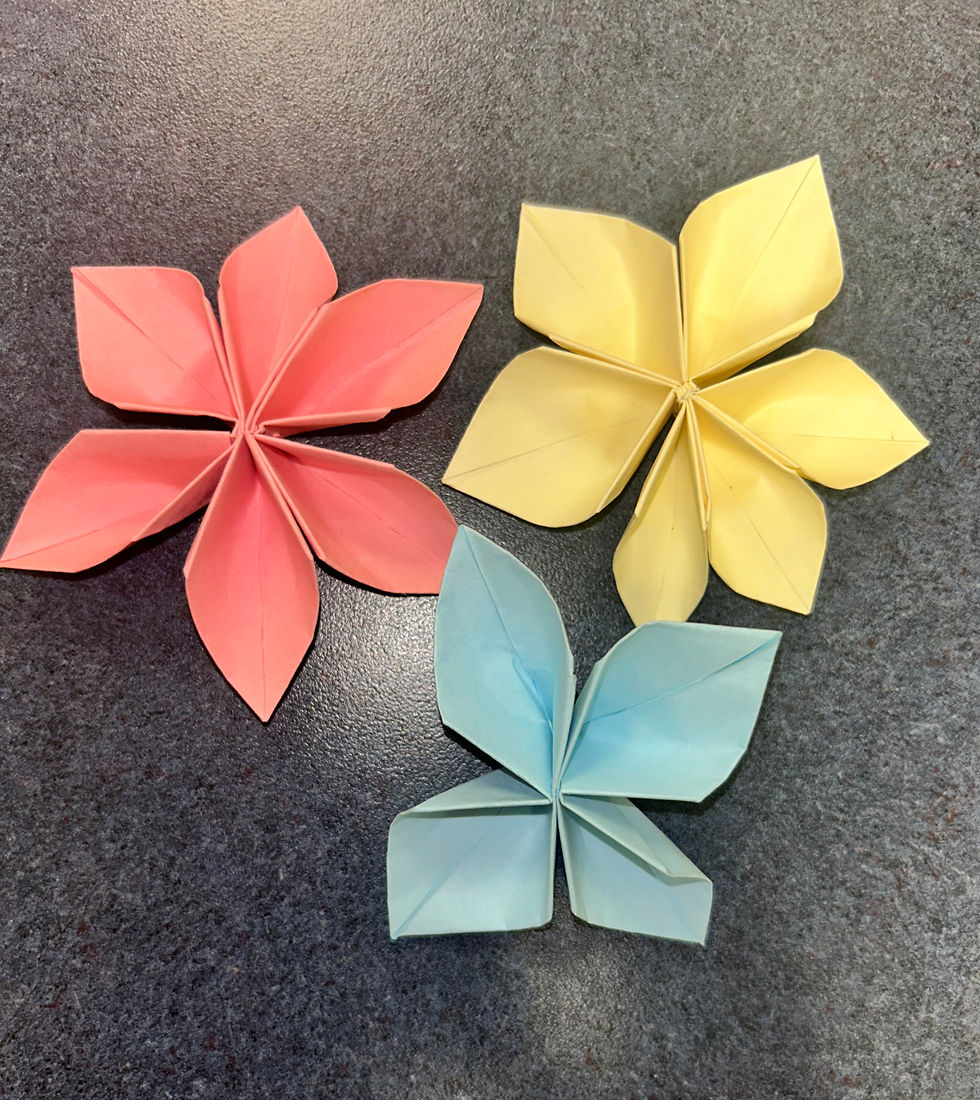
Supplies:
Three sticky notes
Stapler
Step one- Place your sticky note with the sticky part facing down.

Step two- Fold the bottom to the top. Make sure the sections are as even as possible.

Step three- Unfold the paper, then fold it again hotdog style from right to left. Unfold the paper. This should make 4 small squares.


Step four- Flip over the sticky note and fold the bottom right corner until the sharp end points to the center. Repeat with all of the corners.


Step five- Flip the paper over again and position it so that the bottom end pointing towards you is a corner. It should look like a diamond. Then, fold up the corner to the middle of the paper. Repeat with the top flap and fold the paper hamburger style again.


Step six- Your paper should look like a trapezoid. If it doesn't look that way, no worries! It might just be upside down. Fold the shape in half from left to right and set it aside.

Step seven- Repeat steps one-six two more times until you have three folded sticky notes.

Step eight- Position your sticky notes on the table in L shapes with one cradling the other. Then, put another L-shaped note facing away from the other two. Make sure the shorter, open end of the trapezoid is facing upwards on each paper.

Step nine- Push and flatten the notes so they are all evenly pressed against one another.

Step ten- Staple them together in the center.

Step eleven- Go around and pull each flap open to look like petals! You can also push up lightly on the bottom of each petal to loosen the crease in the center and make it stay more open.


You can make as many of these as you want in a variety of colors. You can even attach pipe cleaners to the bottom of each flower like a stem and arrange them in a bouquet!
Thumbprint Butterfly Mug

Supplies:
White mug
Paint
Thin paintbrush
A thumb
Step one- Place your clean and dry mug on a flat surface. My mug has some black marks for a fun design. Yours can have whatever you want, just make sure there's room for your butterflies!

Step two- Dip your finger lightly in some paint. Make sure there isn't too much or else the paint will drip.

Step three- Press your finger on your mug upwards, then again angled downwards directly under the first print. Do this again a little further to the right/left (depending on your dominant hand. Just make sure the wings are facing outward). Make sure to leave a little space in the center.


Step four- Use a thin paintbrush to draw a skinny green line down the center of the wings. You can also draw antennae if you want.

Step five- Repeat steps one-four as many times as you want with lots of colors! Your butterflies can be different sizes and shapes, and you can even use your small paintbrush to add some patterns to the wings.

Step six- Allow the mug to dry overnight.
TIP- This mug is best used for holding pencils, decorations, etc. It is NOT dishwasher safe. The paint will wash off.
Compliment/Remember When Jar

Supplies:
Large Jar
365 sticky notes or note cards of various colors
A pencil/pen
Lots of memories!
Step one- Separate your categories by colors. Two or three is ideal. Each color will correlate to a prompt like "remember when?" or "I love..." or "never forget," etc. You can search online for some special categories or come up with your own! Just make sure the number of cards in each category will add up to 365.
Step two- Write a note/compliment on 365 note cards depending on their category. This can be things like "I love your kind soul" or "Remember when we went to the beach and saw a dolphin?" Anything works as long as it comes from the heart!

Step three- Get a clean and dry jar. You can paint or design it if you want. Fold up each card and place them in the container. Now, your mom can pick a new one out of the jar every day until the next Mother's Day and remember how much you appreciate and love her!
While these simple gifts can't possibly encompass the tremendous care, love, and support mothers dedicate to their children, they are a personal and heartfelt way to say "thank you" on their special day. Every time they see your gift they'll remember the time and effort you put in just for them- a gift that keeps on giving!
Source:


